Overview
If you want to access services in your home network while away from home, but your home connection does not have a public IP, then you need some form of reverse proxy or NAT traversal.

When a user cannot connect directly to services running at home, a server with a public IP can act as the bridge.
What we need to do next is install the frp server and client on the public server and the home side respectively.
| Installation Location | frp Component |
|---|---|
| Public server | frp server, frps |
| Local machine (NAS, Windows, etc.) | frp client, frpc |
Download
[button color=“success” icon=“iconfont icon-fork” url=“https://github.com/fatedier/frp/releases”]GitHub[/button]
|
|
Installation
1. Server Side (the Host with a Public IP)
|
|
Add the following content and save it. Here, bind_port = 7000 is the port used for frp communication.
|
|
Then start the server and wait for the client to connect:
|
|

2. Client Side (Local NAS)
Extract the same package on the client side as well. If your client is Windows or macOS, just download the appropriate build from GitHub instead.
|
|
Add the following content and save it. Again, server_port = 7000 is the port used between frp client and server.
You can expose multiple services. For example, if you want to reach your NAS remotely, you can map the NAS’s local port 22 to port 6000 on the public server, or any other unused port.
That means visiting server-ip:6000 is effectively the same as connecting to 127.0.0.1:22 on your local NAS.
[scode type=“red”] Note: if your server has a firewall enabled, make sure every remote_port you use is opened in the firewall rules. [/scode]
|
|
|
|

At this point the remote access setup is working, but if you want to use it long-term, you will probably also want background execution and auto-start on boot.
3. Start Automatically on Boot
I will show two approaches below. If your client or server is Windows or macOS, you can look up the corresponding startup method for that platform.
Synology DSM
|
|
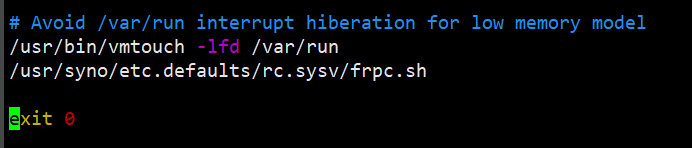
Put these two lines into the script:
|
|
Grant execute permission to the script and edit the startup file:
|
|
Type :$ to jump to the last line, then add the following before exit 0:
|
|
You can now reboot the system and check whether frp starts successfully.
CentOS
- Create a systemd service:
|
|
Add the following content. Remember to replace ExecStart with the actual path to your own frps binary.
|
|
- Manage the service. In normal use, you only need commands
1and3:
|
|
Official Documentation
This post only covers the basic setup. For more features and detailed usage, see: [button color=“success” icon=“iconfont icon-fork” url=“https://github.com/fatedier/frp/blob/master/README.md”]Official Documentation[/button]