Hardware
- CPU / Motherboard: J1900 (Snail NAS)
- Memory: 8 GB DDR3L 1600
- System Disk: 256 GB mSATA SSD
- Data Disks: 3 x 4 TB HDDs (two in RAID 1, one as a standalone storage disk)
- Operating System: Debian 13 (Netinst, command-line only, no desktop environment)
What else you need
- A USB drive: for creating the installer.
- Keyboard, mouse, HDMI cable, monitor: to operate the machine locally.
- A full backup: be sure to back up everything from the old hacked Synology setup, including the HDDs. Creating the RAID will erase the disks.
- Debian 13 ISO: debian-13.3.0-amd64-netinst.iso (direct download) or www.debian.org
- Rufus: rufus-4.13p.exe (direct download) or rufus.ie
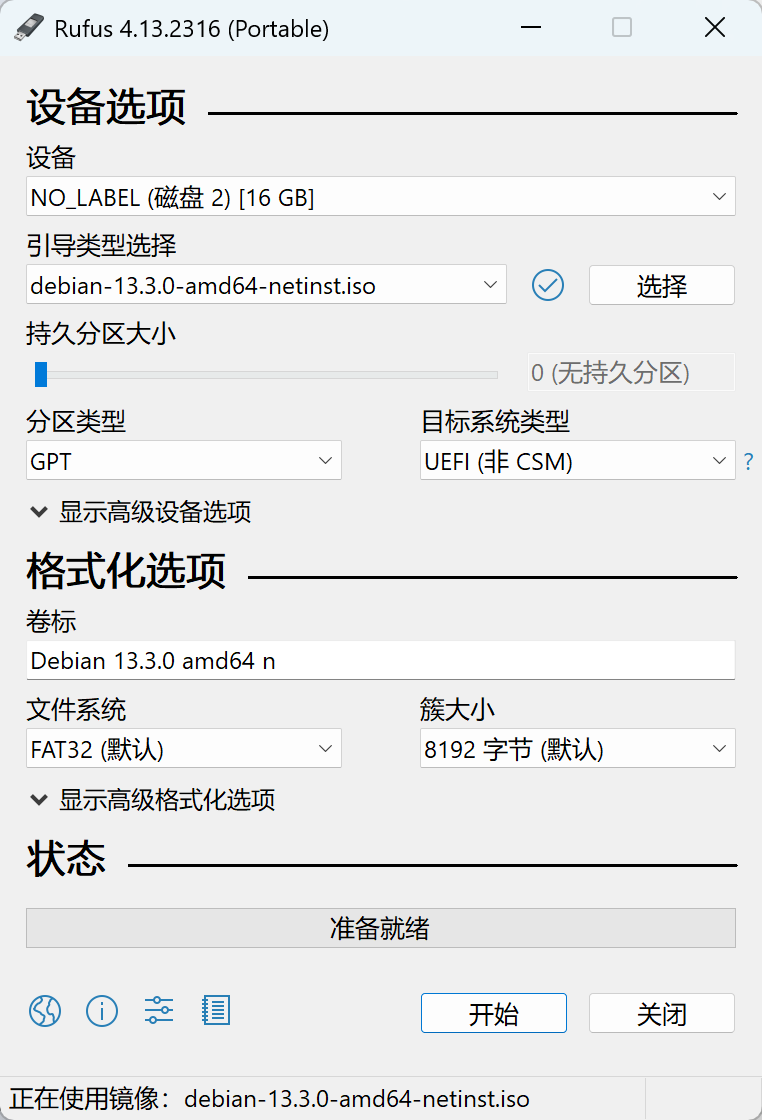
1. Create the Bootable USB
- Prepare the ISO:
debian-13.3.0-amd64-netinst.iso - Write it with Rufus:
- Insert the USB drive and open Rufus.
- Device: select the correct USB drive.
- Boot selection: choose the downloaded Debian 13 ISO.
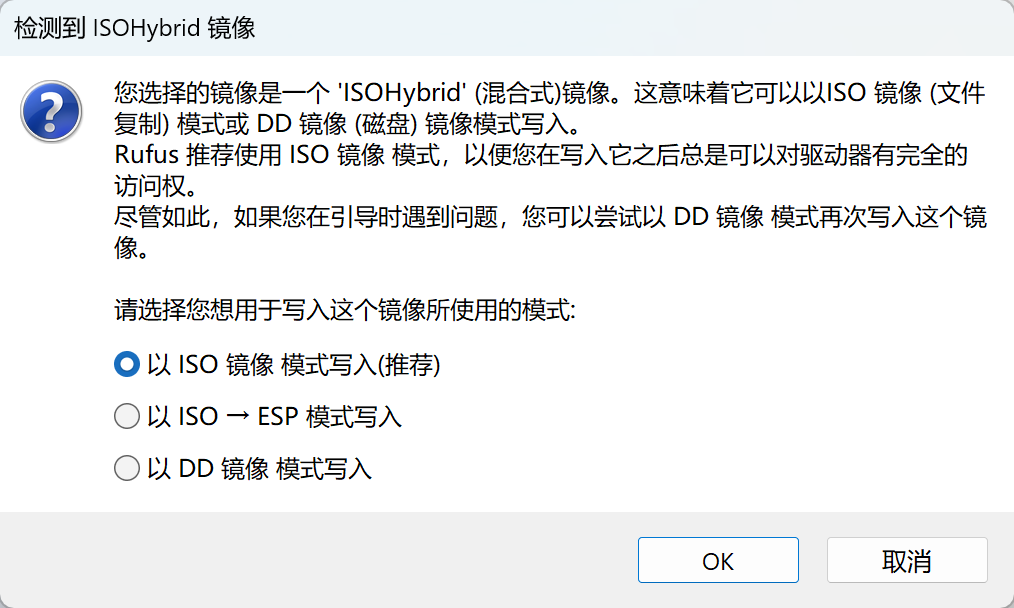
- Partition scheme: keep the default
GPTfirst. If the system refuses to boot later, rewrite it and tryMBRinstead. - Click
Start. When the popup appears, the default ISO Image mode is recommended. On older motherboards with poor compatibility, you can also try DD Image mode.
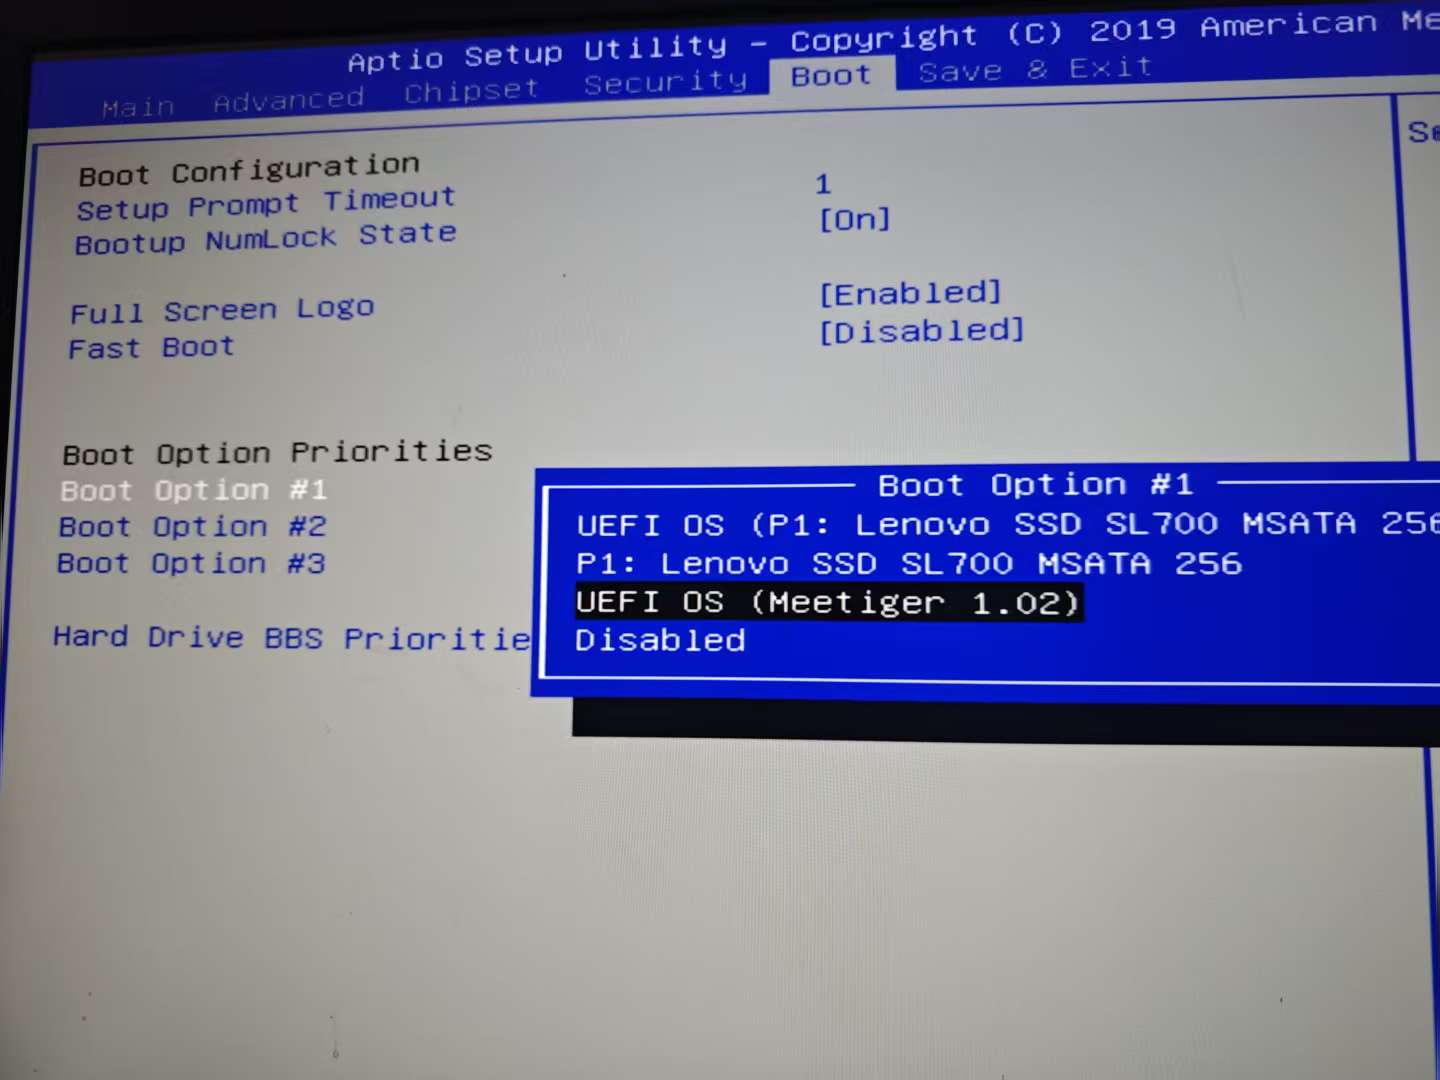
2. BIOS Settings and Boot
- USB port: I recommend plugging the USB drive into a black USB 2.0 port on the rear I/O panel. Front-panel ports and blue USB 3.0 ports are sometimes not detected correctly during the BIOS stage.
- Enter BIOS: repeatedly press
F11orDelwhile powering on. - Adjust the boot order: under the
Boottab, findBoot Option #1, select the USB drive, and move it to the first position. The SSD system disk can stay second. - Compatibility fallback: if the USB drive is not detected:
- Try setting
Fast Bootunder theBootmenu toDisabled.
- Try setting
Save the settings and reboot.
3. Core Debian Installation Options
After booting from the USB drive, choose Install or Graphical install.
- Basic setup: choose the language, time zone, root password, and a normal user account.
- Disk partitioning (important):
- Choose Guided - use entire disk.

- Make sure you select the SSD as the system disk.
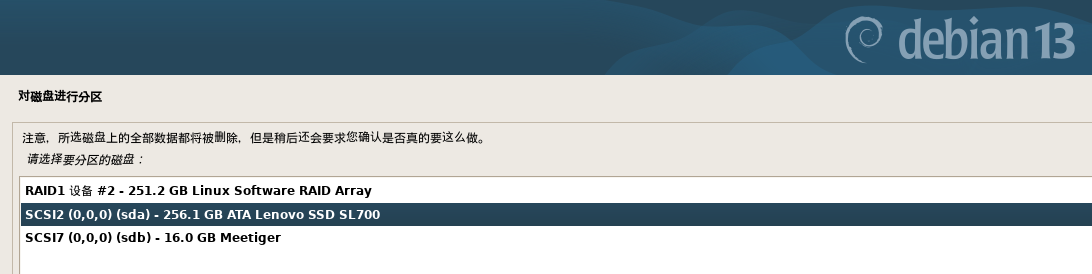
- Choose All files in one partition.
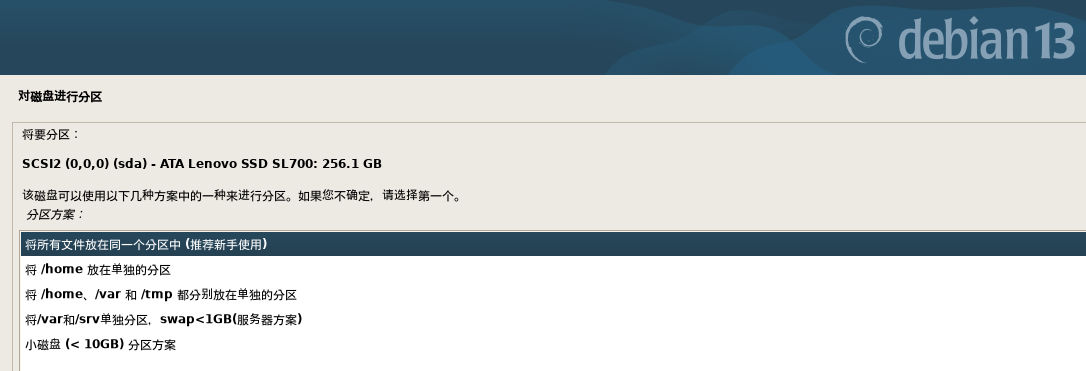
- Confirm and write the changes with
Write changes to disks.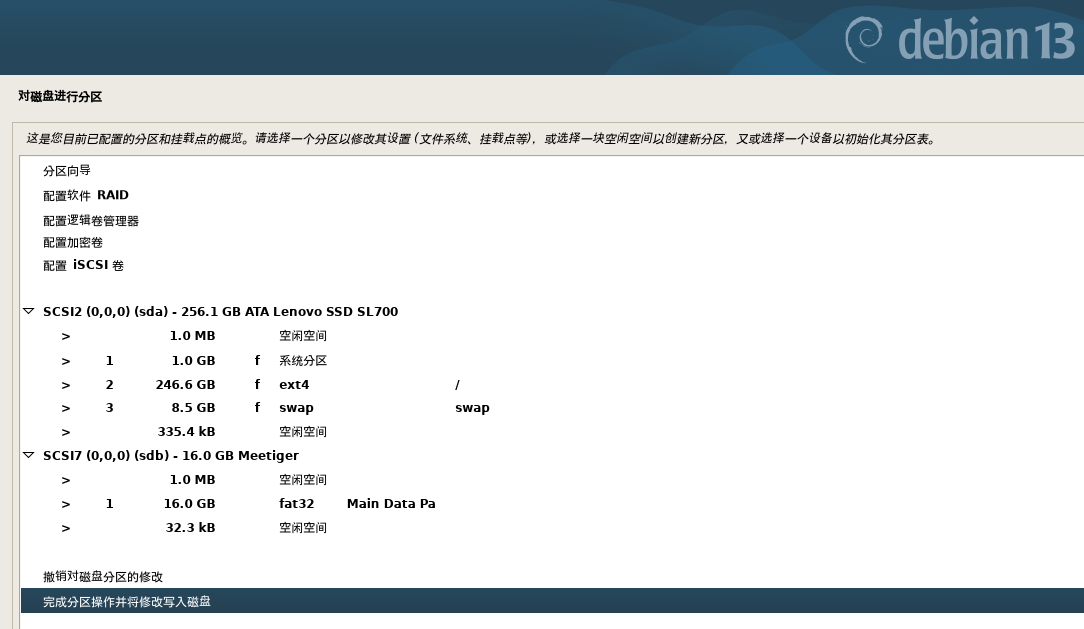
- Choose Guided - use entire disk.
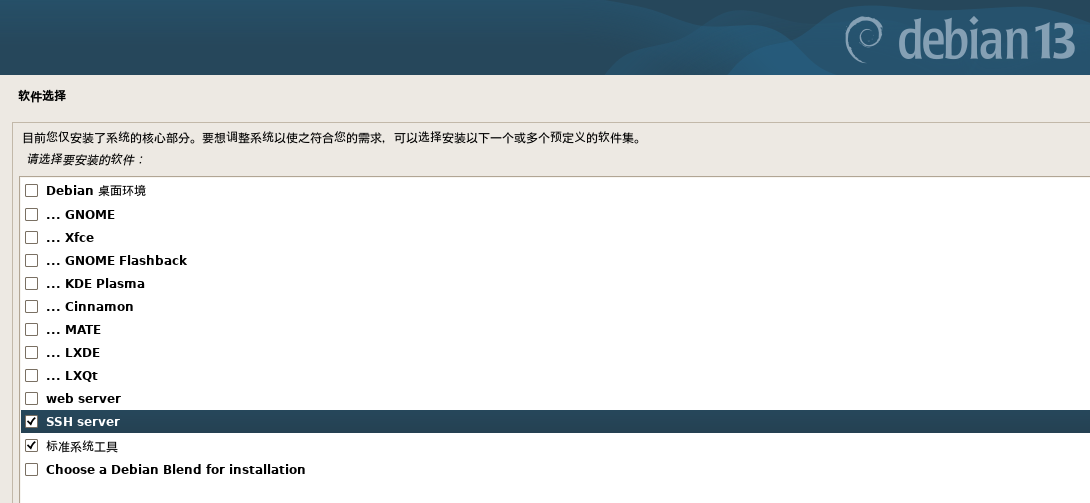
- Software selection:
- Uncheck
Debian desktop environmentand any desktop options such as GNOME. - Keep only
SSH serverandstandard system utilities.
- Uncheck
Once installation is complete, remove the USB drive and reboot.
4. Storage Configuration: RAID 1 plus One Standalone Disk
From another machine on the same LAN, SSH into Debian and switch to the root account with su -.
4.1 Identify the Disks
|
|
Use the disk sizes to identify each device. In this article I assume sda is the system disk, sdb and sdc are the RAID disks, and sdd is the standalone data disk.
4.2 Create the RAID 1 Array
Warning: this will erase the disks. Make sure your data is backed up.
Install the RAID management tool and create the md0 array:
|
|
(If you are warned that the disks contain leftover metadata, enter y to confirm.)
Important: syncing two 4 TB drives takes hours. You can continue with the next steps while synchronization runs in the background. To check the progress:
|
|
Save the RAID configuration so it survives reboots:
|
|
4.3 Format the Disks and Reclaim Reserved Space
Format both the RAID 1 array (/dev/md0) and the standalone HDD (/dev/sdd) as ext4.
Optimization note: ext4 reserves 5% of the disk space for the root user by default. On a 4 TB disk, that is roughly 200 GB. For pure data disks, that is usually unnecessary, so I set it to 0%.
|
|
4.4 Mount the Disks and Enable Auto-Mount at Boot
Create mount-point directories:
|
|
Check and record the UUIDs:
|
|
Edit /etc/fstab with nano:
|
|
Add the following lines at the end of the file. Replace the UUIDs with your real values.
|
|
Test the mounts:
|
|
4.5 Automatic Disk Spin-Down
If the disks do not see much read/write activity, you can configure them to spin down automatically.
|
|
At the end of the file, add entries like the following for your disks. Replace the IDs with your actual ones.
|
|
At this point, the storage foundation is done. All disks are ready, and you can deploy Docker or any other services on top of them.
5. CasaOS
CasaOS is a lightweight, user-friendly home-cloud system built on top of Docker. It aims to give home users a simple all-in-one environment for NAS storage and application management.
That said, after using it myself, I felt it was not especially necessary. The feature set is fairly basic, and for Docker management I still prefer the command line.
|
|
6. qBittorrent
Install qBittorrent with Docker:
|
|
Example compose.yml, which you can adjust as needed:
|
|
Start qBittorrent:
|
|
Open http://nas_ip:8085 in your browser and sign in with:
- Username:
admin - Password:
X9JAJQQr7
Use the password shown in your own logs.
To switch the language:
Tools -> Options -> User Interface Language -> Simplified Chinese, then click Save.
To change the password:
Tools -> Options -> WebUI -> Username / Password, then click Save.
7. Jellyfin
Jellyfin is a free, open-source self-hosted media server for managing and streaming personal video, music, and photo libraries. It is the free software fork of Emby, so users keep full control over their own data. Jellyfin runs on Windows, Linux, Docker, and more, supports hardware transcoding, and can sync watch history across TVs, phones, and web clients.
|
|
Adjust the media mount paths based on your own needs:
|
|
Then start the container with docker compose up -d and open http://NAS_IP:8096 in your browser to begin the initial setup.