0. Integrate Push Notifications
0. Create the Push Certificate and a JPush App
I will skip the details for this part.
1. Integrate the iOS SDK
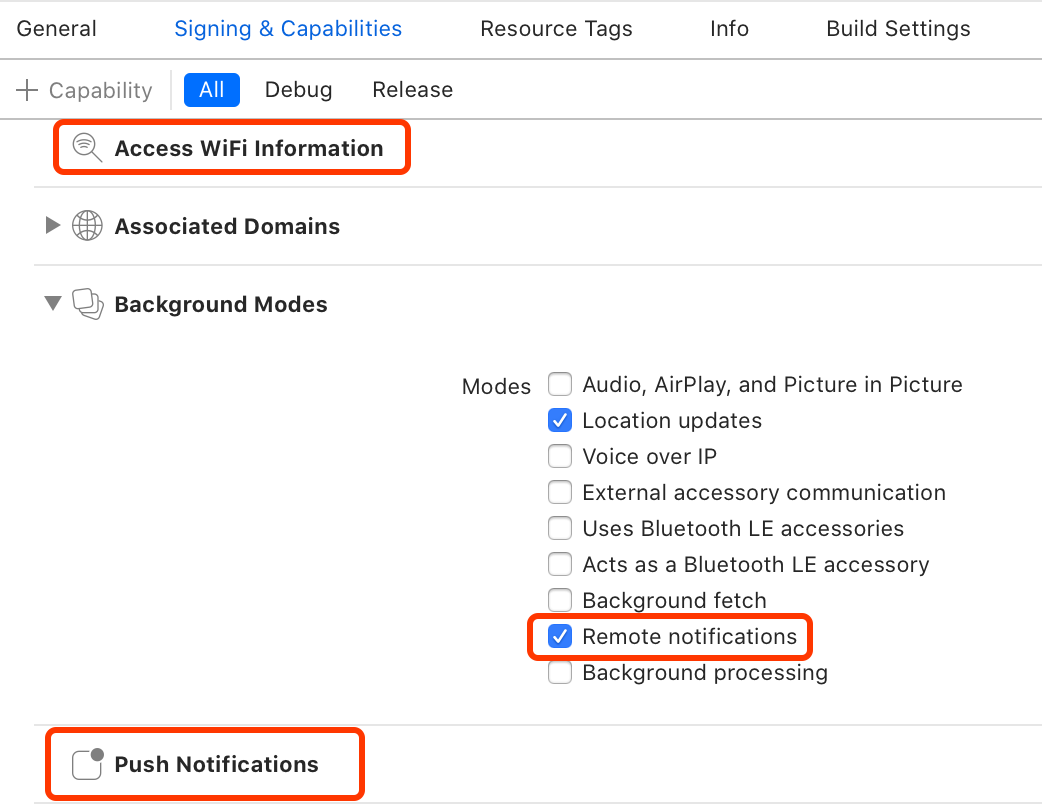
In Signing & Capabilities, add Access WiFi Information and Push Notifications.
Also enable Remote notifications.
Add the following to your Podfile:
1
2
|
  pod 'JCore'
  pod 'JPush'
|
Then run pod install to integrate the SDK.
Add the following to your bridging header:
1
2
3
4
5
6
|
// Headers required for JPush
#import "JPUSHService.h"
// Header required for APNs registration on iOS 10
#ifdef NSFoundationVersionNumber_iOS_9_x_Max
#import <UserNotifications/UserNotifications.h>
#endif
|
There are also version-specific choices and IDFA-related details involved here. See the official JPush docs for those:
JPush documentation
1. Receive Messages
1. Register JPush
Register JPush in didFinishLaunchingWithOptions inside AppDelegate:
1
2
3
4
5
6
7
8
9
|
func application(_ application: UIApplication, didFinishLaunchingWithOptions launchOptions: [UIApplication.LaunchOptionsKey: Any]?) -> Bool {
  // Push setup
  let entity = JPUSHRegisterEntity()
  entity.types = 1 << 0 | 1 << 1 | 1 << 2
  JPUSHService.register(forRemoteNotificationConfig: entity, delegate: self)
  // Replace with your own appKey
  JPUSHService.setup(withOption: launchOptions, appKey: "xxxxx", channel: "App Store", apsForProduction: false, advertisingIdentifier: nil)
  return true
}
|
2. Receive Messages
Implement the methods for uploading the deviceToken and handling incoming push notifications:
 1
 2
 3
 4
 5
 6
 7
 8
 9
10
11
12
13
14
15
16
17
18
19
20
21
22
23
24
25
26
27
28
29
30
31
32
33
34
35
36
37
38
39
40
41
42
43
|
// MARK: -- Push delegate
extension AppDelegate : JPUSHRegisterDelegate {
    func jpushNotificationCenter(_ center: UNUserNotificationCenter!, openSettingsFor notification: UNNotification!) {
        print("jpushNotificationCenter")
    }

    func jpushNotificationAuthorization(_ status: JPAuthorizationStatus, withInfo info: [AnyHashable : Any]!) {
        print("jpushNotificationAuthorization")
    }

    // System-provided token
    func application(_ application: UIApplication, didRegisterForRemoteNotificationsWithDeviceToken deviceToken: Data) {
        _ = deviceToken.reduce("",{$0 + String(format:"%02x",$1)})
        JPUSHService.registerDeviceToken(deviceToken)
    }

    // Failed to obtain token
    func application(_ application: UIApplication, didFailToRegisterForRemoteNotificationsWithError error: Error) { // optional
        print("did Fail To Register For Remote Notifications With Error: \(error)")
    }

    @available(iOS 10.0, *)
    func jpushNotificationCenter(_ center: UNUserNotificationCenter!, willPresent notification: UNNotification!, withCompletionHandler completionHandler: ((Int) -> Void)!) {
        let userInfo = notification.request.content.userInfo
        if notification.request.trigger is UNPushNotificationTrigger {
            JPUSHService.handleRemoteNotification(userInfo)
            UIApplication.shared.applicationIconBadgeNumber = notification.request.content.badge as! Int
        }
        // This callback must be executed to decide how the notification is presented
        print("Received push in foreground, userInfo=\(userInfo)")
        completionHandler(Int(UNNotificationPresentationOptions.alert.rawValue))
    }

    @available(iOS 10.0, *)
    func jpushNotificationCenter(_ center: UNUserNotificationCenter!, didReceive response: UNNotificationResponse!, withCompletionHandler completionHandler: (() -> Void)!) {
        print("Tapped push notification, content=\(response.notification.request.content.userInfo)")
        let userInfo = response.notification.request.content.userInfo
        if response.notification.request.trigger is UNPushNotificationTrigger {
            JPUSHService.handleRemoteNotification(userInfo)
        }
        completionHandler()
    }
}
|
At this point you can already receive the push payload inside jpushNotificationCenter.
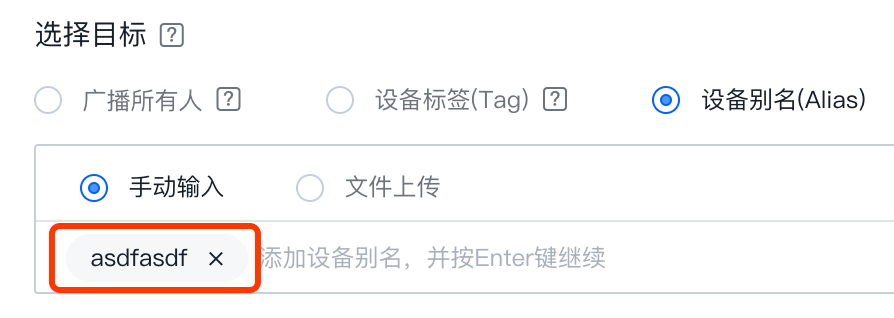
3. Set a Unique Identifier for the Device
Typically you would use something like the user’s unique ID or phone number as the alias. You only need to do this after the user logs in.
1
2
3
|
JPUSHService.setAlias("PhoneNumber", completion: { (iResCode, iAlias, seq) in
                print("alias,\("PhoneNumber") . completion,\(iResCode),\(String(describing: iAlias)),\(seq)")
            }, seq: 0)
|
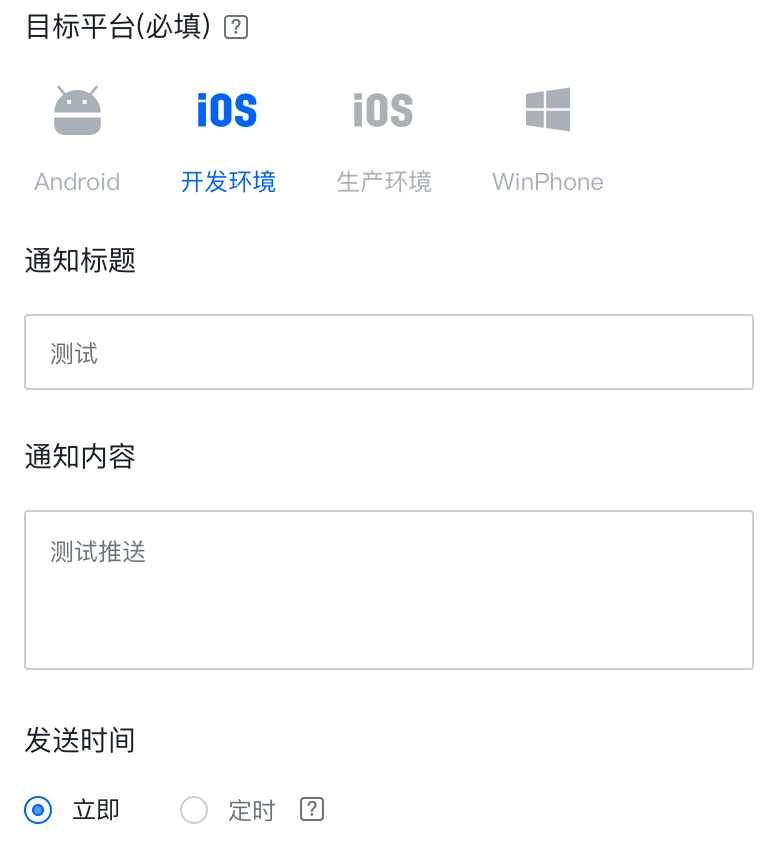
4. Test a Push Message
Go to the JPush console and open the notification-sending page. Filling in just the fields below is enough to test whether the device can receive pushes.
The delivered payload roughly looks like this:
1
2
3
4
5
6
7
8
|
{
    "alert": {
        "body": "test body",
        "title": "test title"
    },
    "badge": 1,
    "sound": "default"
}
|
2. Open the Target Page
First, add the page-navigation code in the app’s main ViewController or another appropriate screen:
1
2
3
4
5
6
7
8
9
|
override func viewDidLoad() {
  NotificationCenter.default.addObserver(self, selector: #selector(jpush(noti:)), name: NSNotification.Name(rawValue: "jpush"), object: nil)
}

// MARK: - Open the target page directly
@objc func jpush(noti: Notification) {
  let jpushViewController = mainStoryboard.instantiateViewController(withIdentifier: "jpushViewController")as!JpushViewController
  self.present(jpushViewController, animated: true, completion: nil)
}
|
Then post that notification when the user taps the push:
 1
 2
 3
 4
 5
 6
 7
 8
 9
10
11
|
@available(iOS 10.0, *)
func jpushNotificationCenter(_ center: UNUserNotificationCenter!, didReceive response: UNNotificationResponse!, withCompletionHandler completionHandler: (() -> Void)!) {
  print("Tapped push notification, content=\(response.notification.request.content.userInfo)")
  let userInfo = response.notification.request.content.userInfo
  if response.notification.request.trigger is UNPushNotificationTrigger {
    JPUSHService.handleRemoteNotification(userInfo)
  }
  let notification = NSNotification.Name(rawValue: "jpush")
  NotificationCenter.default.post(name: notification, object: nil, userInfo: nil)
  completionHandler()
}
|
That completes the page-jump flow. If you need extra data in the push payload, you can add key-value pairs to extra on the server side. They will then appear inside response.notification.request.content.userInfo, where you can read them directly.